Friday, October 03, 2014

Boo-tiful Paper Pumpkin Halloween treat bags

  • Paper Pumpkin kit makes cute treat bags
  • Sign up for the Oct 5 Card Class

I'm having fun with my Paper Pumpkin kit this month, making these cute treat Halloween treat bags.  This year's monthly kits include more product for the same price and often refills are available.  I've already purchased two more refills for my September kit so I'll have plenty of treat bags for little buggers stopping by our home during All Saints Eve! 

Check here if your interested in signing up for  My Paper Pumpkin   For more ideas on how to use this month's kit to create even more Halloween projects, check out over 20 ideas for Paper Pumpkin on Pinterest.


September 2014 - Paper Pumpkin Boo-tiful bags.  Click for larger image
 

October 5 Card Class

 
Reminder: Still time to sign up for this Sunday's Card class. Sunday, October 5, starting at 1:30 pm.  Sign up now!

Here's a look at the 8 cards we'll be making.  Everyone needs a stash of general cards to have on hand for different occasions.  Spend a fun afternoon with snacks, chats, and making these cards. 


This collection of cards uses a variety of the new designer papers, the new In-colors, and new rubber stamp sets, polymer set, which I'm beginning to favor more and more, and new punches, dies, and embossing folder. 
 
Here's a close up of one of the cards we'll make.  This raised flower card is made with vellum, new ribbons and designer papers. The center is a silver Candy Dot base brad painted gold with a marker to match the gold dots in the designer paper, and then the brad was embellished with a pearl center.   
 
Flower Frenzy Bigz L Die
 
Start by using Pink Pirouette and a brayer, Brayer ink onto white velum card stock.  Once dry, we'll use the Flower Frenzy Bugz L Die to cut the flowers.  The velum card stock can be creased from just about the center of the flower to the tip of the petal with a bone folder and then pinch the velum card stock together, which gives it a slightly raised effect.    The big shot die let you cut several flowers at once.  Next, all four of the cut flowers used to make one flower fit into the Perfect Polka Dots embossing folder for a single run through the embossing machine.  Before mounting on the Pink Pirouette base layers, attached the flower to the Whispers White layer so the brad back was hidden. 

For more card ideas, look at a few more July 2014 swaps and card samples from the convention display boards on the photos link in my Meetup site.  Also, sign up to register for this class on my Meetup site at this link to ensure you're first to hear about new classes.   The Meetup site has been down over this week end, so check back at this Meetup link if you're unable to get in the first time.

Recipe: 

  • Stamps: You can add a sentiment of your choice inside  No stamping on the card front.
  • Ink: Pink Pirouette
  • Paper: Lullaby DSP, Pink Pirouette, Whisper White, White Velum Card Stock
  • Accessories: Candy Dot Brad Bases, Pearl Basic Jewels, Blushing Bride ¾” Chevron Ribbon
  • Tools: Brayer, Perfect Polka Dots Textured Impressions folder, Fancy Fan Textured Impressions embossing folder, Big shot Die-Cutting machine, and Magnetic Platform, Textured Boutique Machine, Flower Frenzy Bigz L Die, Dotted Scallop Ribbon Border, Bone Folder
 Do you want to know why I'm able to do classes this year, even with a very busy work schedule?   It's because  Stampin’ Up! is making it easier and easier for demonstrators and customers to get projects done quickly – just what we need with our busy schedules and lack of storage space for all our supplies.  Check out previous posts to see some of the Halloween kits and winter watercolor kits available for a short time.  These on page 36 and 37 of the new Holiday Mini catalog, if you’re one of my regular customers.  If you need a copy of the catalog, download a copy here.


Sign up on my mailing list to be notified of these upcoming classes:


· Early October  – General cards
· Late October – Treat bags
· November – Gift tags & gift boxes
· December – Last-minute Holiday cards and tags
· January – Valentine’s Day
· February – Thinking of You
· March – Graduation gift giving
· April - Mothers’ Day card
· May – Father’s day cards


Enjoy!

 
Donna Ross
Stampin' Up! Independent Demonstrator
Private Classes for 1 or a small group of friends:  http://cardmaking.meetup.com/71/


Monday, September 22, 2014

Fall 2014 Card Making Classes


  • Sign up for the Oct 5 Card Class
  • Get ready for Halloween with this great wreath kit

Getting back to hosting classes has been an objective for several months.  The good news is that I'm hosting a class, Sunday, October 5, starting at 1:30 pm.

Here's a look at the 8 cards we'll be making.  Everyone needs a stash of general cards to have on hand for different occasions.  Spend a fun afternoon with snacks, chats, and making these cards. 


The Stampin' Up! annual catalog went live in June, and this collection of cards uses a variety of the new designer papers, the new In-colors, and new rubber stamp sets, polymer set, which I'm beginning to favor more and more, and new punches, dies, and embossing folder. 
 
One of the cards we'll make is this raised flower card made with vellum, new ribbons and designer papers. The center is a silver Candy Dot base brad painted gold with a marker and embellished with a pearl center.   
 
Flower Frenzy Bigz L Die
 
We'll brayer White velum card stock with Pink Pirouette.  Once dry, we'll use the Flower Frenzy Bugz L Die to cut the flowers.  The velum card stock can be creased from just about the center of the flower to the tip of the petal with a bone folder and then pinched the velum card stock together, which giving it a slightly raised effect.    You'll be able to cut several flowers at once using the Big Show die.  Then all four of the cut flowers used to make one flower fit into the Perfect Polka Dots embossing folder for a single run through the embossing machine.  We'll attached the flower to the Whispers White layer before mounting to a Pink Pirouette base layer so the brad back was hidden.  Take a look at a few more swaps and card samples from the convention display boards on the photos link in my Meetup site.  Also, sign up to register for this class on my Meetup site at this link to ensure you're first to hear about new classes.   The Meetup site has been down over this week end, so check back at this Meetup link if you're unable to get in the first time.

Recipe: 

  • Stamps: None
  • Ink: Pink Pirouette,
  • Paper: Lullaby DSP, Pink Pirouette, Whisper White, White Velum Card Stock
  • Accessories: Candy Dot Brad Bases, Pearl Basic Jewels, Blushing Bride ¾” Chevron Ribbon
  • Tools: Brayer, Perfect Polka Dots Textured Impressions folder, Fancy Fan Textured Impressions embossing folder, Big shot Die-Cutting machine, and Magnetic Platform, Textured Boutique Machine, Flower Frenzy Bigz L Die, Dotted Scallop Ribbon Border, Bone Folder
 Do you want to know why I'm able to do classes this year, even with a very busy work schedule?   It's because  Stampin’ Up! is making it easier and easier for demonstrators and customers to get projects done quickly – just what we need with our busy schedules and lack of storage space for all our supplies.  Three kits from Convention I’m excited to tell you about:
 
With fall / winter holidays right around the corner, Stampin’ Up! introduced two more kits – both from the Holiday mini catalog. One Halloween wreath kit and the other is a Watercolor Winter Card Kit – two super-fun projects. These on page 36 and 37 when you receive your copy of the new Holiday Mini catalog, if you’re one of my regular customers.  If you need a copy of the catalog, download a copy here.
 
Frightful Wreath Simply Created Kit - 135866 - US $26.95
 

Sign up on my mailing list to be notified of these upcoming classes:


· Early October  – General cards
· Late October – Treat bags
· November – Gift tags & gift boxes
· December – Last-minute Holiday cards and tags
· January – Valentine’s Day
· February – Thinking of You
· March – Graduation gift giving
· April - Mothers’ Day card
· May – Father’s day cards


Enjoy!

 
Donna Ross
Stampin' Up! Independent Demonstrator
Private Classes for 1 or a small group of friends:  http://cardmaking.meetup.com/71/


Tuesday, July 22, 2014

2014 Stampin' Up! convention swaps


  • Stampin' Up Convention Swaps 2014
  • Let's get together each month and make our Paper Pumpkin kits
  • Paper Pumpkin kits are 50% off for your first two kits
I can hardly believe Stampin' Up! convention is already over.  It went by so fast!.  I'm so excited about all the new kits and the  Stampin' Up! Holiday catalog we were able to see and buy from right at the show.  I'll be busy making samples until the official launch of the catalog to customers on August 28, 2014.

Meanwhile, here are the three swaps I did for this year's event.  Stay tuned over the next few days as I show you some of the fantastic swaps I received in return.


Stampin' Up! World of Dreams

The Stampin' Up! annual catalog went live in June, and I'm playing with all the new rubber stamp sets, polymer set, which I'm beginning to favor more and more, new punches, dies, and embossing folder. 

Here's the recipe for my first Convention swap card.
     
    Recipe
    Stamps: World of Dreams
    Paper:   Back to Black, Whisper white, Smoky Slate
    Inks:  Jet Black Stazon
    Accessories:  Naturals Can Dots


The Stampin' Up! annual catalog went live in June, and I'm playing with all the new rubber stamp sets, polymer set, (which I'm beginning to favor more and more), new punches, dies, and embossing folders.
 
This is the card I used for Sherri Robinson’s shoe box swap of 50 cards. Sherri has been hosting this swap for as long as I can remember, and it is one of my favorite swaps. This year, I believe the quality was the best-ever. I came away with cards I enjoyed making and that I’ll be proud to display. Here’s my card for this swap:

 
Stampin' Up! Traveler stamp set

  • Recipe: 
    Stamps:  Traveler (pg. 38), World Map background stamp (pg. 38)

    Ink:  Jet Black Staz-on, Baked Brown sugar

    Paper:  Basic Black, Baked Brown Sugar, Naturals Ivory (page 193)

    Accessories:  1-1/4 Burlap Ribbon (pg. 207), Very Vintage Designer Buttons (pg. 209), Baked Brown Sugar Thick Baker’s Twine (p. 207)

    Tools:  On Film Framelit, Paper Piercer (for poking out the small pieces of the photo frame), Big shot Die-Cutting machine, and Magnetic Platform, Bone Folder, Scalloped Tag Topper Punch (pg.221), Dimensionals, Red Sticky Strip tape, Stamping Sponges (Pg. 210)
     

Sherri is displaying her gorgeous face painting from the Awards night after-party.


This raised flower card was a third swap card I made for Convention.  I used this one for Lyssa’s Convention 2014 “Now This is convention Quality” Swap.  As usual, the swaps from this swap were wonderful. 
 
 
Flower Frenzy Bigz L Die


I brayed White velum card stock with Pink Pirouette.  Once dry, I used the Flower Frenzy Bugz L Die to cut the flowers.  I creased from just about the center of the flower to the tip of the petal with a bone folder and then pinched the velum card stock together giving it a slightly raised effect.  The center was held together with a Candy Dot Brad Base with a Pearl in the center.  I was able to cut several flowers at once using the Big Show die.  Then all four of the cut flowers used to make one flower fit into the Perfect Polka Dots embossing folder for a single run through the embossing machine.  I attached the flower to the Whispers White layer before mounting to the Pink Pirouette layer so the brad back was hidden.  Take a look at a few more swaps and card samples from the convention display boards on the photos link in my Meetup site.
Recipe: 

  • Stamps: None
  • Ink: Pink Pirouette,
  • Paper: Lullaby DSP, Pink Pirouette, Whisper White, White Velum Card Stock
  • Accessories: Candy Dot Brad Bases, Pearl Basic Jewels, Blushing Bride ¾” Chevron Ribbon
  • Tools: Brayer, Perfect Polka Dots Textured Impressions folder, Fancy Fan Textured Impressions embossing folder, Big shot Die-Cutting machine, and Magnetic Platform, Textured Boutique Machine, Flower Frenzy Bigz L Die, Dotted Scallop Ribbon Border, Bone Folder
 
Lyssa has so much fun at her own swaps. . .and she was honored with many awards this year including Founder’s Circle!  Yeah Lyssa!


This year is going to be so much fun for stampers.  Stampin’ Up! is making it easier and easier for demonstrators and customers to get our projects done quickly – just what we need with our busy schedules and lack of storage space for all our supplies.  Three kits from Convention I’m excited to tell you about:
 
Paper Pumpkin kits are going to be even more exciting!  These once-a-month kits offer even more value, with precut papers and accessories included, giving you everything you needs (except the usual scissors, glue, etc.) to make cute projects that you’ll be excited to use for birthdays or gifts. Order month to month, or save money by signing up for a monthly subscription.
 
  • I'm thinking about hosting a monthly Snack, Chat and Craft meetup for ladies who want to get together and make the Stampin' Up! monthly Paper Pumpkin kit.  Let's share ideas for ways to use the kit other than the standard way the kit is configured.  Any interest?  Sign up for my mailing list or leave me a comment below.
  • Don't receive your monthly Paper Pumpkin kits yet?  Sign up between now and Sept 10 and get your first two months at 50% off.  Shipping is free.
 
 
With fall / winter holidays right around the corner, Stampin’ Up! is introducing two more kits – both coming with the  Holiday mini catalog at the end of August.  U.S. Demonstrators can begin pre-ordering items 1-August-2014.   One Halloween wreath kit and the other is a Watercolor Winter Card Kit – two super-fun projects. These on page 36 and 37 when you receive your copy of the new Holiday Mini catalog next month, if you’re one of my regular customers.  If you don’t have a U.S. demonstrator and need a copy of the holiday mini catalog, send me a quick note before the end of July so I can add you to my catalog mailing list.
 

Sign up on my mailing list to be notified of these upcoming classes:
 
· August - Birthday Cards
· September – Treat bags
· October – Thank you cards
· November – Gift tags
· December – Last-minute Holiday cards and tags
· January – Valentine’s Day
· February – Thinking of You
· March – Graduation gift giving
· April - Mothers’ Day card

· May – Father’s day cards


Enjoy!

 
Donna Ross
Stampin' Up! Independent Demonstrator
Private Classes for 1 or a small group of friends:  http://cardmaking.meetup.com/71/


Monday, April 21, 2014

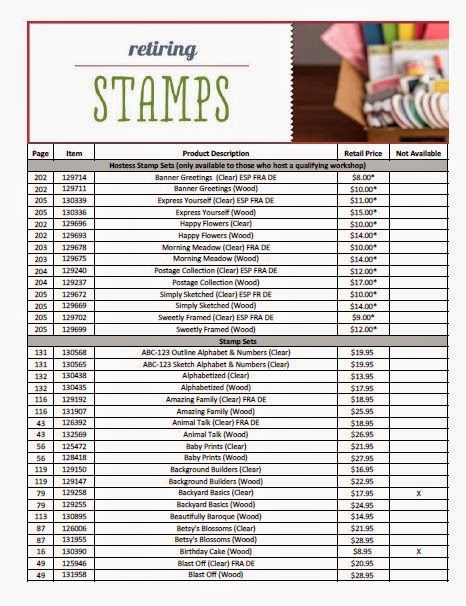
Stampin' Up! Retired stamps and accessories lists announced + Free shipping until April 25.

  • Retiring stamps and accessories lists announced
  • Act Quickly.  Some items are already out of stock.
  • Free standard shipping on your order April 21-25

Every year I hear from someone who waits too long before placing their order from the current catalog.  

"Oh please...you have to help me! I'm in the middle of making 100 Graduation invitations and I need just one more package of .... Well, you fill in the blank. What do you do?  Start your project over, from scratch, using a different set of colors?  Or create a whole new design because the stamp set you wanted to use sold out before May 31?  

Thank goodness I have a wide circle of demonstrator friends to help me find that final pack of retiring paper or that perfect stamp set.  We've been able to help our customers find a lot of what they need...but not everything.  Sometimes when they're gone; they really are gone!

Why take that chance?  Follow my lead.  I'm going through my catalog now to see which stamps and accessories I'm going to order before this year's catalog expires.  And I'm taking advantage of free standard shipping between April 21 and April 25, 2014!  Plus I'm going to qualify for hostess benefits if my order is over $150!  (Free products!)  Please don't wait.  Products on these lists are only available while stocks remains.  This is your last chance to purchase these items before the release of the new Stampin' Up! 2014-2015 catalog in early June!  Download the retired lists today and order now, while everything is in front on you. 

Click on image to download Retiring Stamps: 

Stampin' Up! Retiring Stamps list - 2014
Click timage to immediately download


Click on image to download Retiring Accessories:


Some items have already sold out.  Click list to download.
Check list before ordering.


Free standard shipping is available on purchases until Friday, April 25.


These in-colors and Designer Series Paper Stacks will retire.


2012-2014 In Color Designer Series paper Stack-item 130137--retires June 4

Remember that the 2012-2014 In Color designer Series paper Stacks, (item 130137) the 12 X 12 40 sheet paper packs will retire, too.  You'll want at least one of these paper stacks to coordinate with your retiring colors


You can quickly scroll through images of all of the retiring stamps and accessories here.   Use the pull down to show all.  Which stamp set or accessory are you the most sad to lose and why?  For me I think it is the Framed Tulips Textured Impressions embossing folder die and the Full Heart punch.  Both are long-time staples for creating wonderful projects.

To place an order for any products above:  Visit my Stampin' Up! Store 


Quick Links

Enjoy!

Donna Ross
Stampin' Up! Independent Demonstrator
Private Classes for 1 or a small group of friends:  http://cardmaking.meetup.com/71/


Tuesday, March 04, 2014

Drama in Black and White


  • Dazzle without color
  • Black and white Easter Eggs
I read a comment from a photographer once who said, "Color wants to dazzle your eye and mind so much that at time it tires."  I'm constantly looking on-line for card ideas.  Sometimes I see so many colors together in a card that I wrinkle my nose and turn away because the color choices and card design lack synergy. I'm drawn back to back and white.  It's not just the simple absence of color; its the drama you can create with a simple black and white.  Almost any creation in black and white can create drama.  Take a look at the eggs in the basket I created as part of my Easter display this year. 
    
    The drama of black and white.  Click for larger image

    
 The  Occasions Catalog includes the Simple Stems stamp set used on this card.  Its a design I've used  before, updated with stamps available now. I cut three layers of flowers and added dimensions between the layers.  The sentiment is also raised on dimensionals.  The butterfly is hand-cut, with wings folded up from the body to add more texture to the card.
    Simple Stems Thank You Card.  Click to see a close up image.
    Recipe
    Stamps: Simple Stems (133098-w; 133101-c); Flowering Flourishes (131998-w,126367-c), Papillon Potpourri (132058-w; 123759-c) 
    Paper:   Whisper White, Basic Black
    Inks:  Black Stazon
    Accessories:  Small Oval and Large Oval punches, Essentials (126187) Paper Piercing Pack, Paper Piercer, Dimensionals.


    These eggs were so easy to make.  There great conversation starters.  Simply use your paper piercer to make small holes in each end of an egg.  Blow through the top hole until the contents of the egg flows out the bottom hole.  I made my husband a very large omelet Sunday morning with the contents from the blown eggs.  After washing the eggs I dried them and once dry, I used a Black Sharpie Pen to create the designs.


    Eggs designed with a Sharpie marker pen.

     The eggs were designed with a Black Sharpe and look wonderful in a white milk glass basket I've had forever.  What are you designing for Easter this year?

Quick Links

Enjoy!

Donna Ross
Stampin' Up! Independent Demonstrator
Private Classes for 1 or a small group of friends:  http://cardmaking.meetup.com/71/


Tuesday, February 25, 2014

Spring Blossoms with Simple Stems

With the weather in Houston turning balmy this weekend, it made me reach for the fresh Spring colors in the Sweet Sorbet Designer Series Paper along with the Simple Stems Stamp sets.
    
    
    Sweet Sorbet Designer Series Paper
The  Occasions Catalog includes the Simple Stem Stamp Set, which was cut into three layers with Dimensions between the layers.  I love cards with lots of layers and the die cut, ribbons and hand-cut flower layers make me think of colors I want to wear this spring.  I doubled the 3/8" Crisp Cantaloupe Ruffled Stretch Trim.   Candy dots worked perfectly in the upper corner.  The little  thank you sentiment is from Express Yourself stamp sets punched on Word Window and mounted on the Modern Label punched shaped.  I hope you enjoy this fresh card. 
    Recipe
    Stamps: Simple Stems (133101 - C), Express Yourself (130339-C)
    Paper:   Sweet Sorbet Designer Series Paper (133521), Pool Party, Whisper White
    Inks:  Calypso Coral, Gumball Green, Basic Black
    Accessories:   Modern Label Punch Word Window punch, Candy Dots, Deco Labels collection framelit (130102),  Big Shot Die Cut Machine and cutting Pads, Big Shot Magnetic Platform (130658), 

Quick Links

Enjoy!

Donna Ross
Stampin' Up! Independent Demonstrator
Private Classes for 1 or a small group of friends:  http://cardmaking.meetup.com/71/